🖇️ Clippy for iPadOS and iOS

The Problem

Even though clipboard managers on iPadOS/iOS have never been as powerful as their counterparts on macOS, there is clearly a need for a utility which can easily save and let you retrieve things like links and bits of text. For years I used Copied, but that app is no longer in active development. I’ve tried several other apps in an attempt to find a successor to Copied, but none is worthy of the throne. So, out of desperation I decided to create my own using Shortcuts. It’s not nearly as nice as Copied and doesn’t do as many things, but it satisfies the basic need that I had.

The Solution

First, this shortcut wouldn’t be possible without the excellent Data Jar, an app that lets you save information that can be called by Shortcuts. It’s free to download and use, which is good because you will have to install it in order to use my shortcut. If you do use Data Jar, please make use of the in-app Tip Jar to send the developer a few dollars.

My shortcut, affectionately named 🖇️ Clippy, is rather straightforward in how it works. Here’s a quick overview:

  • It’s built to work with a dictionary in Data Jar called 🖇️ Clippy. The first time you run the shortcut, it will check Data Jar for that dictionary, and if it doesn’t find it, it will create it.
  • Inside that 🖇️ Clippy dictionary is where you can create the other dictionaries (referred to in the shortcut as lists) to save your clippings for posterity. By default, the shortcut will save new entries to the đź“Ą Inbox dictionary (which will also be created the first time you run it, since that dictionary won’t yet exist).
  • When you run the shortcut, you can choose whether you want to save a new item or retrieve something you have already saved.
  • When saving a new item, you can select the destination list (actually, dictionary) and assign it a name.
  • New items to be saved can be sent to the shortcut via either the Share Sheet or the clipboard.
  • Note that 🖇️ Clippy only saves text and URLs. I just wanted a place for quick text and URL archival and retrieval; there are better solutions, in my opinion, for saving things like images and files for easy access in the future.
  • When retrieving an item, you can select more than one item. If you do, they will be merged—with each item on a new line—and copied to the clipboard together.

If you find this shortcut to be useful, then I highly recommend adding it to your homescreen. I keep it in my dock so that I can run it from there. Typically, I add items via the Share Sheet and only tap on the app icon to retrieve items, but you can copy something first and then tap on the icon to save it to one of your lists.

You can organize your lists (dictionaries) by going into Data Jar and creating new dictionaries, moving items from one dictionary to another, deleting items, renaming items, etc. You’ll probably want to do that from time to time.

Download 🖇️ Clippy here.

Create a Craft Note and Get Its Link

The Problem

Over the past few months, I’ve been using Craft as my primary note-taking app. It’s excellent overall, but one of its shortcomings is that when you create a new note using Shortcuts, it doesn’t return the link to that note. (In fact, Craft’s Shortcuts actions always open the app, even if you toggle off the Show When Run option, which should force it to run in the background.) I have several shortcuts that I use to generate notes, but then I want to use the link to the newly created note in a later step in the shortcut (e.g., adding a follow-up task to Things with the Craft link in the Notes field). It seemed like there had to be a way to accomplish this, but for several weeks I couldn’t find the answer.

The Solution

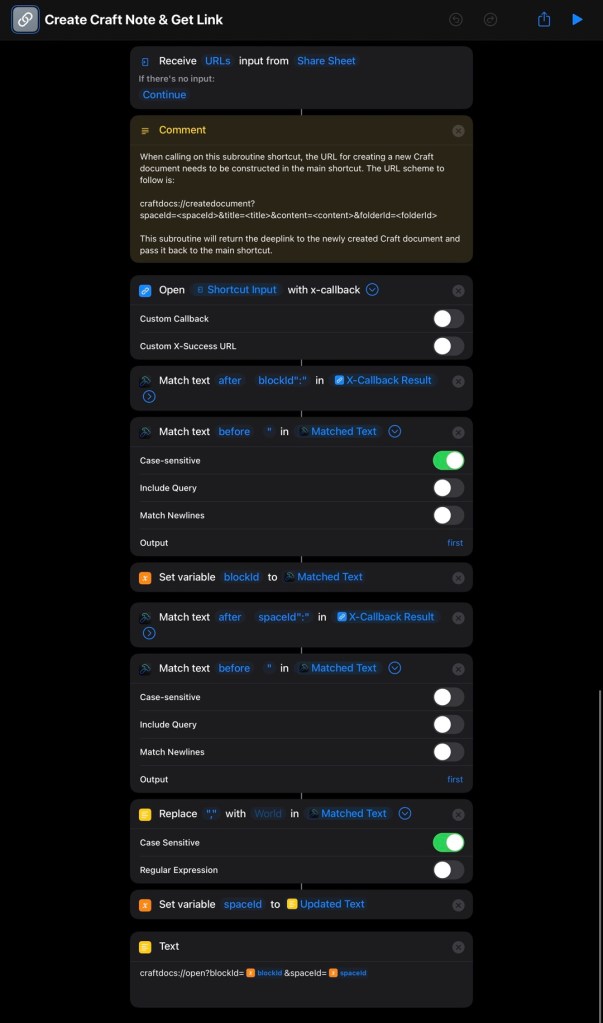
Enter Craft’s URL scheme. Thankfully, Shortcuts actions are not the only way to automate Craft. Its URL scheme provides complementary functionality, and it allows me to solve this problem. What I have done is constructed a subroutine that will accept a Craft URL, run the URL to create the note, process the information returned by Craft to recreate that note’s link, and then pass that link back to the main shortcut. It’s simpler than it sounds, and as long as the main shortcut passes a properly constructed Craft URL to this subroutine, it works well.

If you use Craft and have run into this problem, feel free to download my shortcut.

Capturing Tasks from Messages

The Problem

A recent episode of the Automators podcast (episode 71, to be exact) explored the various ways to capture information (tasks, events, reference notes, etc.), one of the central pillars of GTD. There’s a lot of good information in it, including lots of helpful automation tips and best practices for getting ideas out of your head before they evaporate. As David and Rosemary noted in their discussion, capturing tasks via email is easy, but capturing tasks in the context of a message—whether that message comes via SMS, iMessage, Slack, Discord, Facebook, etc.—is not as easy. I created a shortcut to help with this, and I’ve been meaning to write it up here for a while. Thanks to the Automators for the final nudge to post this!

The Solution

While no messaging app that I know of has a way to share a message with a native iPadOS/iOS task manager (share sheets are a rarity in these apps in general), every service I’ve used will let you copy the text of a message by long pressing on a message bubble. Starting with the copied message text, my shortcut will ask for the name of the sender and the name of the messaging platform so that it can create the note for the task that will be created in Things. It’s not the same as having a link directly to the message in question, but it gives me enough context to know what I’m doing when I sit down to do the task. Knowing when a message was sent, by whom, and in what app allows me to find it easily enough if I need to, or at least go back to that conversation so that I can respond when I’m finished. The final step in the shortcut will open a new task in Things, with the notes section filled in and the cursor in the title field, ready for me to type in what needs to be done.

If you download this shortcut, please be sure to open it and read through the comments. And you will definitely want to tweak it to fit your particular usage of messaging apps. Happy capturing!

Using youtube-dl on iPad

Problem

As part of my work advocating for special-needs orphans, I produce a (mostly) weekly podcast highlighting several of the children on our website. Whenever one of the featured children has a video posted on our site, I try to include an audio snippet of the child talking or, as in the case of one little boy, jamming on his toy guitar. I record, edit, and publish this podcast entirely on my iPad (except for those rare occasions when the episode is an interview), and it’s been a challenge to figure out how to extract the audio from these kids’ videos, which are almost always hosted on YouTube or Vimeo. There are various apps for the Mac that’ll download YouTube videos, but there’s nothing comparable for the iPad. I discovered that it’s possible to download these videos using the iCab browser if you change the user agent, but I could never get this to work consistently. There is a command-line program you can run called youtube-dl that will download videos from YouTube (and other sites). The problem is, the iPad doesn’t ship with a Terminal app like the Mac does, so while I could do this on my Mac, I struggled to find a way to use this command on my iPad. During its beta period, the iOS/iPadOS app iSH Shell handled youtube-dl fine, but following its public, non-beta release and the removal and subsequent reinstatement of youtube-dl from GitHub, I couldn’t get iSH Shell to work properly. Maybe that’s because I’m a command-line novice, but whatever the cause was, this was no longer working for me. I was close to giving up, but one last search last weekend proved to be unexpectedly fruitful.

Solution

The answer lies with another command-line app for the iPad: a-Shell. I’d heard about this app before in the context of youtube-dl—I think on an episode of the Adapt podcast—but I was never able to get it to work. Everything came together, though, when I found this YouTube video explaining how to install ffmpeg in a-Shell. That was the missing piece in my previous attempts. I highly recommend watching the video, but I’m going to list the steps below. Once ffmpeg has been installed, youtube-dl works great in a-Shell on the iPad.

  1. Install a-Shell.
  2. Run the command pip install youtube-dl to install the youtube-dl package.
  3. Download ffmpeg from this GitHub page. Follow that link, scroll down to the bottom section, and click the link for ffmpeg. Or, you can click here to download it directly on your iPad. This will put it in your default downloads folder, which, in my case, is the Downloads folder in iCloud Drive.
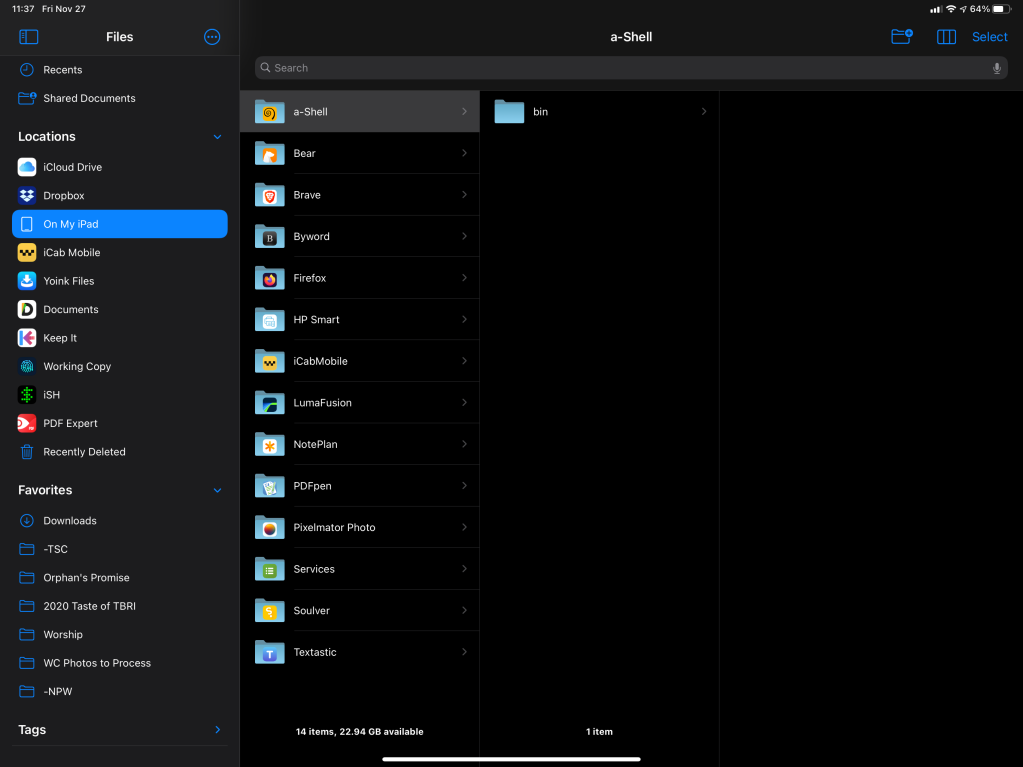
  4. In the Files app, navigate to the On My iPad section and select the a-Shell folder. In that folder, create a folder called bin.
  5. Move the ffmpeg.wasm file from the Downloads folder into the bin folder. Now that it’s inside of a-Shell’s folder, the app can call on that program when it runs youtube-dl.
  6. Start using youtube-dl!
screenshot of the bin folder in the Files app

The simplest thing to do is to type the command youtube-dl <link to YouTube video>. That will create a video file, in that bin folder on your iPad, of the online video. Be warned, however, that by default youtube-dl will generate a .mkv video file, which is unplayable on the iPad without installing another app or converting it. I recommend telling a-Shell to download the best .mp4 version of a video by inserting -f '(mp4)' just before the video link. Give this one a try: youtube-dl -f '(mp4)' https://youtu.be/tEvXVJHTQAk

For more information on what you can do with youtube-dl, read this page. I didn’t realize there was so much I could do with youtube-dl, and I’m glad to know that I can download only the audio, if that’s all I really want.

All in all, I’m quite happy with this setup. I no longer have to use my Mac to download videos reliably and then transfer those files to my iPad. Everything can now be done directly on iPad, which is fantastic.

(Update 2020-12-01): If the a-Shell folder doesn’t appear in the On My iPad section of the Files app, try issuing the following commands back-to-back:

  1. cd ~/Documents
  2. mkdir bin

The first command makes sure that you’re in the main a-Shell folder, and the second creates the desired bin subfolder. Doing that should jog the Files app into showing all of this. If you still can’t see this in Files, reboot your iPad.

(Update 2020-12-02): If you saw this post via the link on MacStories and tried Federico’s shortcut, you might be unable to find the downloaded files in the Files app. According to a-Shell’s developer, files saved via the shortcut are saved to a $SHORTCUTS folder, which is invisible in the Files app. In a-Shell, use the command cd $SHORTCUTS to navigate to that folder, and then you can use UNIX commands like ls or mv to see, move, rename, etc. the files in that folder.

Quick Tip: Not-So-Smart Punctuation

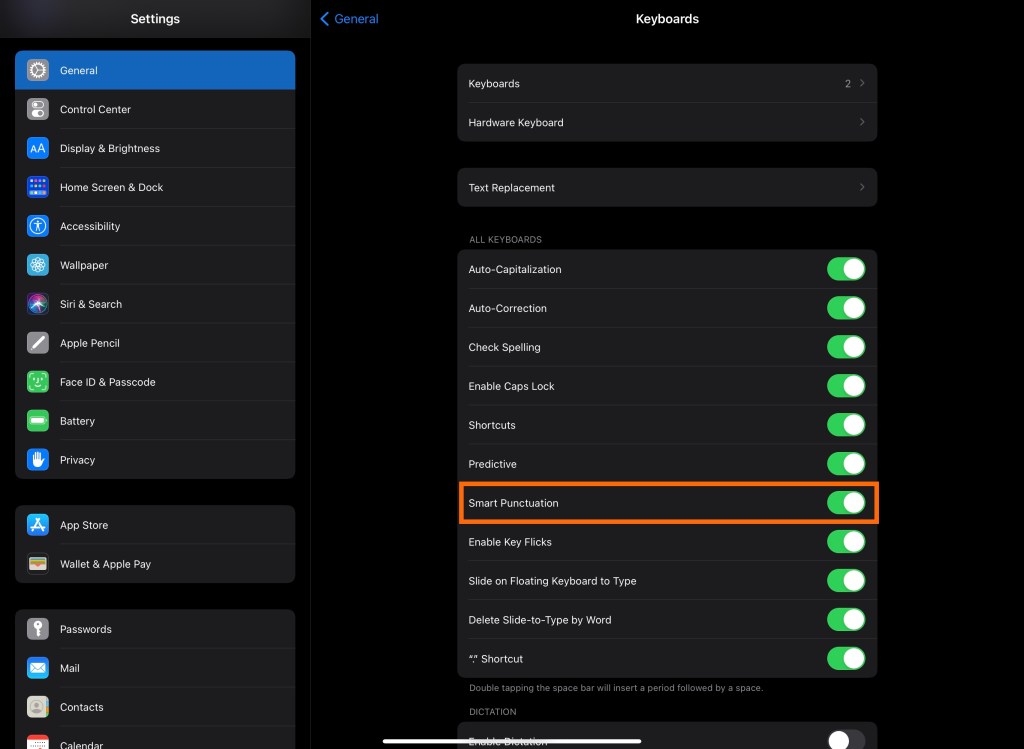
I manage several WordPress websites, and I do so using my iPad, which is my primary computer. A little while ago I was debugging a bit of HTML in the WordPress editor, as it wasn’t rendering as expected. I went over every line carefully but could not locate the error. It was starting to get under my skin, and then I stumbled across my mistake: I had turned on Smart Punctuation in the keyboard settings for my iPad. All I had to do was open the Settings app, go to General > Keyboard > Smart Punctuation and toggle that feature off. I frequently turn on Smart Punctuation for other things, but now I know that I have to turn it off when coding for the web.

screenshot of Smart Punctuation toggle in the Settings app

So, if you find yourself coding on iPad and can’t figure out why your seemingly valid code isn’t giving you the intended result, check your Smart Punctuation setting.

Maybe one day I’ll be able to create a shortcut to toggle this setting on and off so that I don’t have to do it manually every time. The next-best thing is a shortcut created by Federico Viticci that allows you to jump straight to various locations within the Settings app. You can download the shortcut on this page; just search for Open Settings to find the right shortcut.

One Folder to Rule Them All

Six or seven years ago, I watched Merlin Mann’s Inbox Zero talk on YouTube, and his GTD-based, common-sense approach to email profoundly altered my own approach to email. One of the specific takeaways for me was that it would benefit me to stop taking the time to file each message into one of the many nested folders I’d created, and instead simply file all processed messages into a single Archive folder. That seemingly simple change saved me time and the mental energy needed to decide which folder each message belonged to while processing email, and it also saved me the step of trying to remember—or re-determine, in a reinvent-the-wheel scenario—which folder to start looking in when trying to find a particular message later on. But it also did something unexpected: it allowed me to take fuller advantage of good email apps—specifically on iOS—by using swipes and keyboard shortcuts.

These days, the most popular email apps have been influenced by Mann’s Inbox Zero idea—at least in some ways and to varying degrees of faithfulness to his original conception of the term—and one of the results of that is that these apps tend to be built around the ability to archive your email messages quickly. For example, the app I’m currently using to manage my email, Spark, allows you to designate which folder will serve as the Archive for each of your email accounts. Once you do that, you can quickly tell the app to archive any message in your inbox in one of two ways:

  1. Set up a swipe gesture in Spark’s settings to archive messages with a simple swipe left.
  2. Using an iPad with an external keyboard, simply hit command-delete.

Now, Spark is not the only email app to offer this kind of feature, so whichever app you’re using will probably have a quick, built-in way to archive messages. This is one case where choosing the less mentally-taxing method of doing something not only results in being more efficient but also in working with the grain when it comes to email apps.

My advice? Try it. Try using only one Archive folder for storing your emails, and try using keyboard shortcuts to move your processed messages there. Who knows? You just might like it.k I know I did.

Email Documents with Yoink

Problem

You’re working on a document, and you want to email it to someone else. So what do you do? Close the document. Go to your email client. Open the message draft. Click the button to attach a file. Navigate your files and folders until you find it. Click OK. Finally finish composing your email.

Hold on a second. All of that, just to email the document you were just looking at? Seems rather inefficient, doesn’t it? Yes, yes it does. Thankfully, there’s a better, faster way to do precisely this.

Solution

For this to work, you’ll need to buy a $7 app called Yoink. This is a great utility app that slides a little shelf out from the side of your screen whenever you start dragging an item, like a file or an image. You can place multiple items—or stacks of items—into the shelf and then grab them to insert them in other apps. That’s how we’re going to solve this problem.

Open a document on your Mac. In most apps, in the top center of the document window, you’ll see the name of the file with a little icon next to it on the left. That little icon is called the proxy icon. As an example, I’m using TextEdit, but this will work in almost every Mac app.

I click the proxy icon, wait a split second until the icon darkens, and then start dragging it. As soon as the drag starts, Yoink’s shelf slides out from the right-hand side of my screen, and I drop the icon there. Next, I go to my message window in Airmail. Then it’s as simple as dragging the file from Yoink into the composer and voilà! It’s been attached, and all in a few seconds without once having to work with an Open/Save dialogue.

See this workflow in action here.

(I should note that some apps have incorporated a Share extension in recent versions of macOS, and that will allow you to create a new email message with the file attached in just a couple of clicks. This isn’t as widely available as proxy icons, and it necessitates creating a new email message. If you’re replying to an email or in the middle of a draft already, then you probably don’t want to create a new message. I find the proxy-icon-to-Yoink workflow to be more available, and thus more reliable.)

Bonus Tip

Thanks to the drag-and-drop capabilities of iOS 11 and the introduction of Yoink on iOS, you can do the same thing on your iPad. Instead of dragging a proxy icon (those don’t exist on iOS), you can add the file you’re working on to Yoink via its share extension. Then you can go to your email, open up Yoink (I prefer to do that in slide-over rather than split-view, but either will work), and drag the file into your message.

So the next time you find yourself working on a document that you want to mail to someone else, consider doing it via Yoink, one of the apps I depend on most on my Mac and iPad.


Sharing Contacts with Team Members

Problem

When you work with other people, there are a number of things that are beneficial to share with the rest of your team (or at least some of them). Calendars? Easy, thanks to the built-in sharing features of both iCloud and Google Calendar. Documents? Easy, thanks to services like Dropbox, etc. Reference notes? Easy, thanks to the likes of Evernote, et al. Contacts? Easy. Well, not so fast. This isn’t so easy. Not at first glance, anyway. How do I share a subset of my Contacts database with someone else? Unlike digital calendars, there’s no way to share just a group of contacts with someone else from a single iCloud account. The key word here being single. Hold that thought.

Solution

The way around this problem was easier than I first thought. It was certainly much easier than the way I used to solve this problem. When I first started working here, it was in the days before iCloud, and I used to share groups of contacts with others by exporting a group as a .vcf file and emailing it to the other person, who would then have to import those contacts and replace them on her Mac. Every single time changes were made, we would have to go through this. Thankfully, those days are far behind us.

In the end, all I had to do was create a second, free iCloud account (go to icloud.com to get started) which I would use only to store and sync contacts. That’s Step 1. Step 2 was to sign into that iCloud account on my Mac, but not as my primary iCloud account. That’s a key piece of information. You can actually sign into multiple iCloud accounts on a single Apple device, but only one of them can be your primary iCloud account. That’s the one that will sync your documents, Keychain, Photos, network settings, etc. Any other iCloud account you sign into can be used for Calendars, Reminders, Notes, Mail, and/or Contacts. Huzzah! There it is! So, what I did was uncheck the boxes for everything except Contacts. We’re now half-way there.

Step 3 was to get the app BusyContacts for my Mac. I know it might seem a little pricey at $49.99, but it is way more powerful than Apple’s built-in Contacts app. And if you’re going down this road of managing multiple Contacts accounts and groups, you’re going to need a tool that’s up to the task. BusyContacts is that tool, and it makes working with multiple Contacts accounts and various tags a breeze.

Now, I would be remiss if I didn’t mention Apple’s rollout of two-factor authentication (TFA) for all iCloud accounts. As of June 15 2017, all iCloud accounts have two-factor authentication enabled. That’s relevant here because if you want to use BusyContacts to access your iCloud contacts, you have to create an app-specific password to authorize BusyContacts. Providentially, the guys behind BusyContacts have published a tidy explanation of how to do just that. You’ll need to create an app-specific password for BusyContacts from your primary iCloud account, too, in order for BusyContacts to have access to all of your contacts. Be sure to save those passwords!

Step 4. Once you’ve signed into your iCloud account in BusyContacts, you’ll see that what were termed Groups in Apple’s Contacts app are handled as tags in BusyContacts. Different terminology, same basic idea. You need to make sure that all of the contacts you want to share have the same tag, then select all of the contacts with that tag and move them to the address book for the new iCloud account you’ve created. To do that, just control-click on the selected contacts and choose the address book for that secondary, Contacts-only iCloud account.

Step 5. For anyone else on your team who needs that information, all you have to do is give them the login credentials for the iCloud account (as the account holder, you’ll likely get the TFA login notification on your device, so you’ll have to send them the code to allow them access), then they can log into that account on their devices and access that same group in Contacts. Important note: If they’re just planning to use the stock Contacts app on their Mac or iOS device, they do not need to have an app-specific password. Only non-Apple apps need those. After that, you’re up an running, and any changes made will automatically be synced to anyone logged into that iCloud account. Much easier than it used to be in the pre-iCloud days, and all of your documents and other iCloud data will be safe, since that is all tied to your primary iCloud account.

P.S.: One final recommendation. If you’ve gone through the above steps, take the additional step of setting up automatic backups of your contacts database through BusyContacts. That way, you have a fail-safe for this information in the event something should go wrong.

Save iPhone Voicemails to Todoist

Problem

No matter what task-management system you use, one essential element is the ability to add tasks seamlessly and consistently. In my case, I use Todoist to keep track of what I need to do, so I obviously want all of my tasks to end up there. Creating to-dos based on e-mails is easy (Airmail is my current e-mail app of choice), but not everything comes to me in the form of an e-mail. In most of those cases, I use the Quick Entry shortcut (ctrl-opt-cmd-j for me) on my Mac and Siri on my iPhone. (The latter is done using Reminders and IFTTT, but that’s a post for another day.) Every once in a while, though, someone will call me and leave a voicemail that I then need to do something about. What am I supposed to do with that?

Solution

Enter Dropbox and Workflow. The solution I’ve pieced together wouldn’t have been possible in earlier versions of iOS, but it is now. I can’t remember exactly when Apple added this feature, but dating back to at least iOS 9, it’s possible to export voicemail recordings from the Phone app. Trouble is, the share sheet you see when you try to do that is very limited. So limited, in fact, that the Todoist share extension doesn’t show up. That’s where Workflow and Dropbox step in.

I created a four-step workflow (which you can download here) that exports the audio recording of the voicemail to a Dropbox folder (which I’ve conveniently titled Voicemails), gets the link to that file, asks for the name of the task to be done, and then creates a new Markdown-formatted Todoist task with the name of the task linked to the voicemail. (One of the best features of Todoist is the ability to use basic Markdown syntax in task titles to create nicely formatted tasks. I love it!) I wanted to be able to access all the information for a given task whether I’m on my Mac, my iPad, or my iPhone, and this was the smoothest path I could think of to gain access to voicemails across devices. Now I can tackle that voicemail-based action no matter what device I happen to be using. But that’s not all.


To tie everything together, I created a Hazel rule on my Mac
that watches that Voicemails folder. Any file in that folder more than two weeks old gets move to the trash. This means I don’t even have to think about deleting the audio recordings; they just disappear automatically. And if I haven’t dealt with a voicemail in two weeks’ time, then I’ve probably got bigger problems, anyway.

(Note: If you’re interested, you can hear a description of a previous version this workflow—back when I used Things—on episode 309 of Mac Power Users. Thanks, David and Katie, for sharing this on your show!)