Save iPhone Voicemails to Todoist

Problem

No matter what task-management system you use, one essential element is the ability to add tasks seamlessly and consistently. In my case, I use Todoist to keep track of what I need to do, so I obviously want all of my tasks to end up there. Creating to-dos based on e-mails is easy (Airmail is my current e-mail app of choice), but not everything comes to me in the form of an e-mail. In most of those cases, I use the Quick Entry shortcut (ctrl-opt-cmd-j for me) on my Mac and Siri on my iPhone. (The latter is done using Reminders and IFTTT, but that’s a post for another day.) Every once in a while, though, someone will call me and leave a voicemail that I then need to do something about. What am I supposed to do with that?

Solution

Enter Dropbox and Workflow. The solution I’ve pieced together wouldn’t have been possible in earlier versions of iOS, but it is now. I can’t remember exactly when Apple added this feature, but dating back to at least iOS 9, it’s possible to export voicemail recordings from the Phone app. Trouble is, the share sheet you see when you try to do that is very limited. So limited, in fact, that the Todoist share extension doesn’t show up. That’s where Workflow and Dropbox step in.

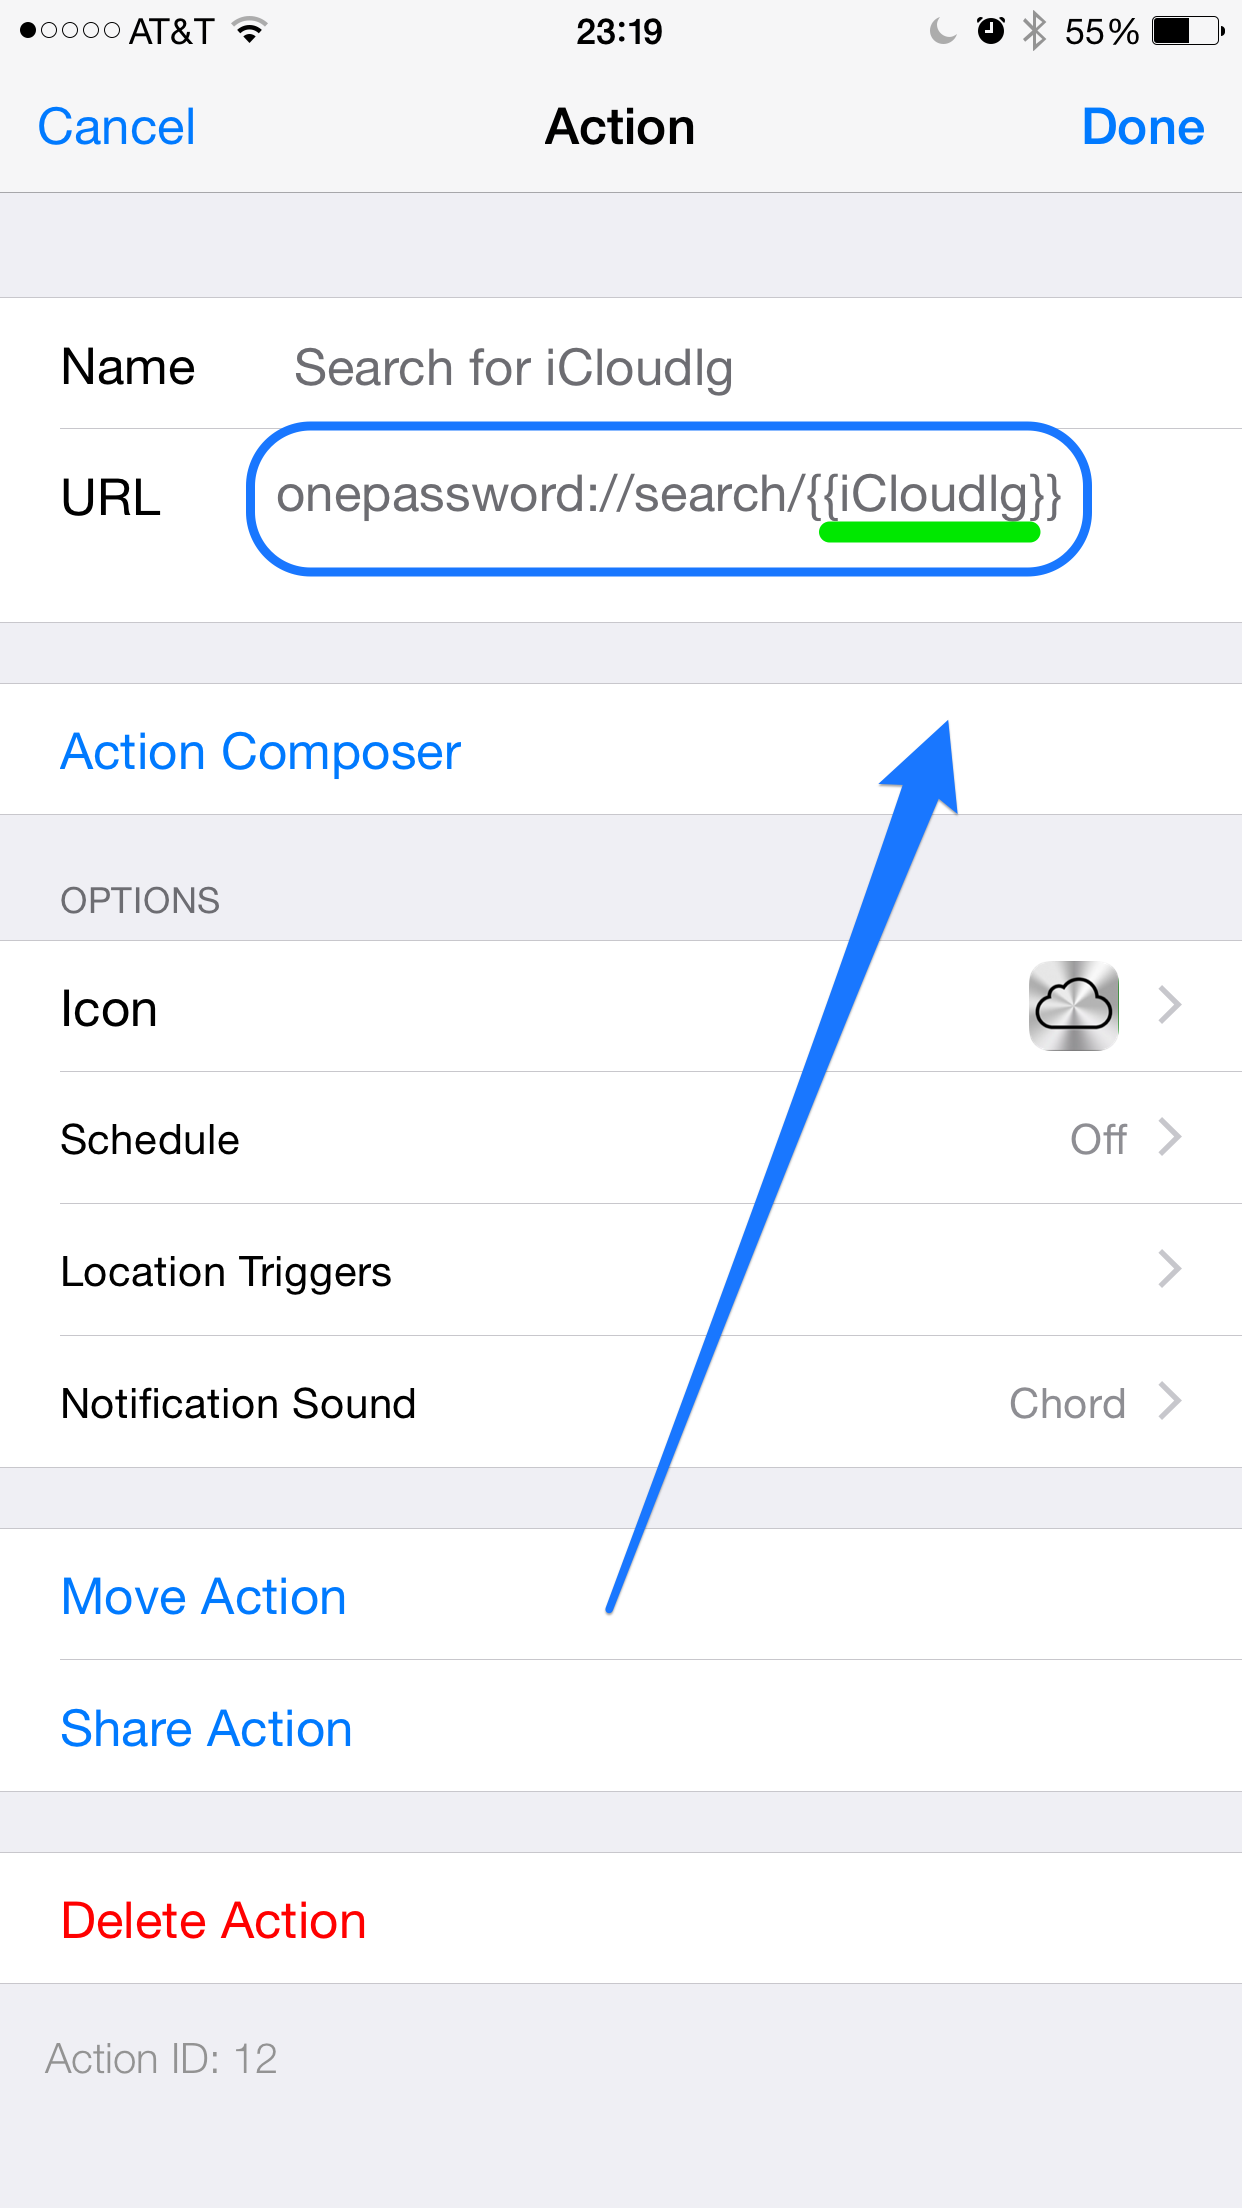
I created a four-step workflow (which you can download here) that exports the audio recording of the voicemail to a Dropbox folder (which I’ve conveniently titled Voicemails), gets the link to that file, asks for the name of the task to be done, and then creates a new Markdown-formatted Todoist task with the name of the task linked to the voicemail. (One of the best features of Todoist is the ability to use basic Markdown syntax in task titles to create nicely formatted tasks. I love it!) I wanted to be able to access all the information for a given task whether I’m on my Mac, my iPad, or my iPhone, and this was the smoothest path I could think of to gain access to voicemails across devices. Now I can tackle that voicemail-based action no matter what device I happen to be using. But that’s not all.


To tie everything together, I created a Hazel rule on my Mac
that watches that Voicemails folder. Any file in that folder more than two weeks old gets move to the trash. This means I don’t even have to think about deleting the audio recordings; they just disappear automatically. And if I haven’t dealt with a voicemail in two weeks’ time, then I’ve probably got bigger problems, anyway.

(Note: If you’re interested, you can hear a description of a previous version this workflow—back when I used Things—on episode 309 of Mac Power Users. Thanks, David and Katie, for sharing this on your show!)

Saved 1Password Searches in iOS

NPW 002 Launch Center Pro Searches 1Password

Problem

When 1Password’s share sheet extension debuted last year with the launch of its iOS 8-compatible app, it nearly obviated the need to copy passwords from a 1Password vault and then paste them into Safari. (Yes, I know that 1Password has a built-in browser, but I still preferred to use Safari the vast majority of the time.) But, even after this advancement and the introduction of Touch ID, there are still times when one’s iCloud password must be entered. The most annoying thing about those “Enter your iCloud password” pop-up boxes is that there is no way to access the share sheet, so 1Password can’t help. Or can it?

Solution

Enter Launch Center Pro. If you’ve never used Launch Center Pro, think of it as something like Alfred for iOS. At its most basic, it can be used as an app launcher, but with a little bit of digging, you can do a lot more on an iPhone/iPad with it, especially if you use some of the other third-party apps that support URL schemes. That’s what allows me to do what I do with Launch Center Pro and 1Password.

Open Launch Center Pro and tap on one of the + icons to create a new action. In the URL field, enter the following:

onepassword://search/{{YOURSEARCHTERM}}

From Skitch

If you create this action using the Action Composer in Launch Center Pro, it will default to providing a keyboard prompt for the search term. That means that every time you launch the action, you’ll need to type in your search term. That’s very useful, but it’s not how I look up my iCloud password. To do that, I have iCloudlg inside the double curly brackets. The lg there stands for login, as in iCloud login. I added those two extra letters so that when I search my 1Password vault for “iCloudlg”, I will only get my iCloud login account. Without that suffix, every account that uses my iCloud e-mail address for the username shows up in the list, and that’s not what I want.

(You might notice in the screenshot that I also use a custom iCloud icon for the action. I simply downloaded the image for that after a quick Google search, saved it to my Camera Roll, and selected it from within Launch Center Pro. This makes the action very easy to identify at a glance.)

So, whenever I need my iCloud password, I simply open Launch Center Pro, trigger the saved Search for iCloudlg action, use Touch ID to unlock 1Password, swipe to the right across the iCloud entry, copy the password, and I’m in business. That sounds like a lot of steps, but the iOS device does most of the work, and it’s a lot easier than manually searching 1Password for “iCloud” every time I need to do so.

Keeping Track of Phone Messages & Conversations

NPW 001 - Line2 plus Evernote

Problem

In the old days (2–3 years ago), we had a landline for our non-profit, and all too often I found myself writing down notes about a voicemail or a phone conversation in a notebook. The obvious downside to that is that those notebooks aren’t searchable (that is, not without significant effort to digitize them). This wasn’t a good long-term plan in my estimation, so I set out to find a better way to do this. And I did.

Solution

We swtiched our phone from a landline to a VoIP service—Line2,to be precise—and I started using Evernote to keep up with messages and conversations. I’d started using Evernote to take notes during phone calls even before we moved away from a landline, but my use of it for this really took off once we started using VoIP. One of the best features of Line2 (and one that I assume is also true of other VoIP providers) is that whenever a voicemail is left, an mp3 copy of the message is automatically e-mailed to you. So I set up a simple rule that automatically forwards those voicemail notification e-mails to my Evernote account. That does three things:

  1. It gives me an archive of the voicemail itself, in case I ever have to go back to it. It’s rare that I have to replay a voicemail, but it has happened.
  2. It gives me an easy place to take notes on my conversation with that person. It also means that if I call someone back and have to leave them a voicemail, I can record that all in the same place.
  3. It makes all of this easily searchable, as Evernote has excellent search capabilities.

This has worked exceptionally well for me over the past couple of years. Having all of these voicemails in Evernote has made me almost fully reliable when it comes to calling someone back, and it has also saved us a considerable amount of money. Our phone bill is now significantly less than it was before making this change. I call that a win-win.