Run Custom AppleScripts in MailMate

Update (2018-02-15)

I discovered today that the bundles behavior of MailMate has changed since I wrote this post. All the bundles you could enable in the app’s preferences pane used to be installed with the app. Now, however, the bundles are downloaded and installed from GitHub when you enable them in the preferences. (See this post from MailMate’s developer for more information.) I haven’t yet figured out how to work around this as a non-developer, but if I do, I’ll update this post further.


Overview

Goal: In addition to recurring tasks that I need to do on a regular, ongoing basis, there are other sets of tasks that I need to do on a recurring but non-regular basis. For example, whenever a family begins a new adoption and sends us the information on the child(ren) being adopted, there’s a series of tasks that I need to do in order to get things rolling for them. This can happen at any time, and in order to make sure that I don’t miss anything for any child’s adoption, I’ve created an AppleScript that adds a new project to Things whenever I get that email. That’s an AppleScript that I want my Mac’s email client to trigger automatically.

Problem:MailMate doesn’t have an easy, built-in way to trigger a custom AppleScript. This is one thing—quite possibly the only thing—that Apple’s Mail.app does more easily than MailMate. But don’t despair. There is a way to do this with just a few minutes and some careful attention to detail.

Solution: For each AppleScript that you want to run, you have to create a custom bundle in MailMate, which isn’t nearly as intimidating as it might sound, even for a non-developer like me. In fact, I still don’t know how to define a bundle or properly describe it to someone else, but that hasn’t stopped me from successfully creating about a dozen of them. Let’s get to it.

Set Up Custom AppleScripts for MailMate Rules

  1. Go to ~/Library/Application Support/MailMate/Managed/Bundles and locate the Things.mmbundle file. I used the Things bundle as a template because I wanted to set up rules for my inbox that would create specific tasks and projects in Things based on certain criteria. (More on that in a future blog post.) But, since these tasks are created by AppleScript, you can use this bundle as a way to execute any other AppleScripts you might want to have MailMate execute automatically.
  2. Duplicate the file in the Finder, rename it, and open it with a text editor. I used TextWrangler, and it worked great for this. Whatever you do, though, do not open the original version of the Things.mmbundle file, because that, at the very least, will serve as your template for other custom AppleScripts in the future.
  3. Open the Terminal app. You’re going to need to generate three separate UUIDs for this by running the simple command uuidgen. Go ahead and run it three times, and then leave the Terminal window open so that you can copy those UUIDs and paste them into the bundle at the appropriate spots.
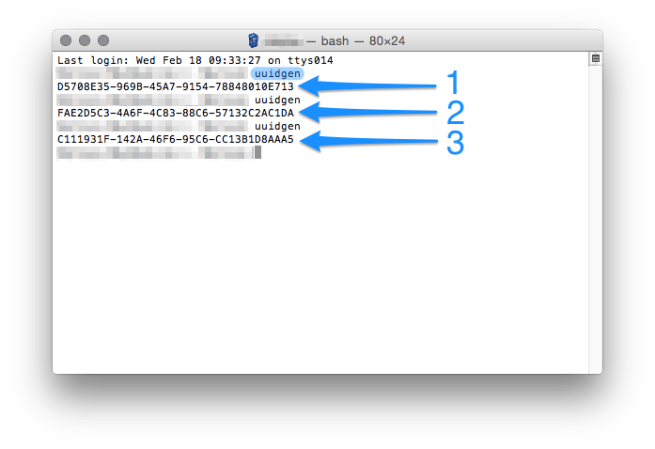
  4. NPW MailMate Bundles 2.png
  5. In the Add With Summary section (see sidebar), change the UUID near the bottom of the code with the first UUID generated in the Terminal.
  6. NPW MailMate Bundles 3.png
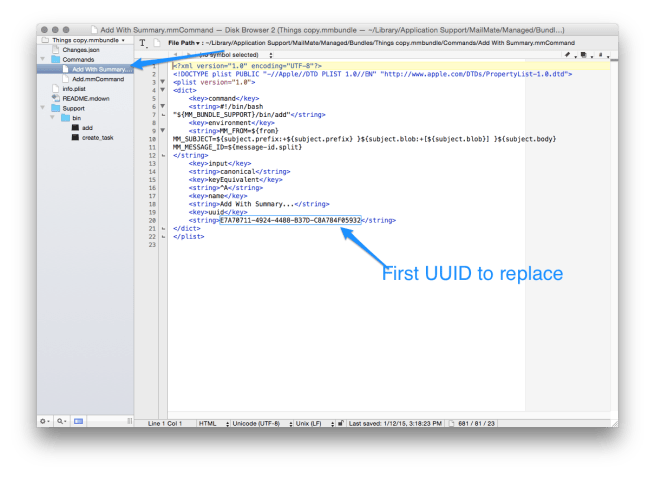
  7. Do the same thing in the Add.mmCommand section, using the second UUID generated in the Terminal.
  8. NPW MailMate Bundles 4.png
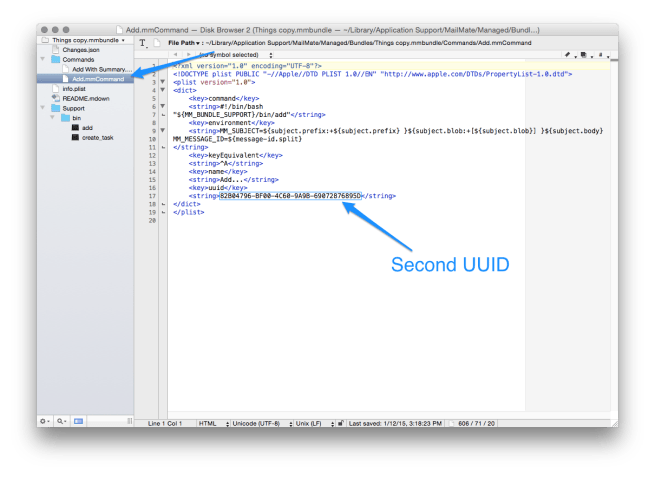
  9. Make the same change in the info.plist section, using the third UUID generated in the Terminal.
  10. NPW MailMate Bundles 5.png
  11. In the info.plist section, also be sure to change the name of the bundle. This is the name that will show up in the Command menu in MailMate. If you don’t change it from Things.bundle, MailMate will only list one Things bundle but won’t know which one to trigger. So be sure to follow this step.
  12. Save the new text bundle.
  13. Relaunch MailMate.
  14. Set up your mail rule for your inbox, and enjoy the rush when your AppleScript is triggered by an incoming message and your Mac does precisely what you wanted it to do.

Saved 1Password Searches in iOS

NPW 002 Launch Center Pro Searches 1Password

Problem

When 1Password’s share sheet extension debuted last year with the launch of its iOS 8-compatible app, it nearly obviated the need to copy passwords from a 1Password vault and then paste them into Safari. (Yes, I know that 1Password has a built-in browser, but I still preferred to use Safari the vast majority of the time.) But, even after this advancement and the introduction of Touch ID, there are still times when one’s iCloud password must be entered. The most annoying thing about those “Enter your iCloud password” pop-up boxes is that there is no way to access the share sheet, so 1Password can’t help. Or can it?

Solution

Enter Launch Center Pro. If you’ve never used Launch Center Pro, think of it as something like Alfred for iOS. At its most basic, it can be used as an app launcher, but with a little bit of digging, you can do a lot more on an iPhone/iPad with it, especially if you use some of the other third-party apps that support URL schemes. That’s what allows me to do what I do with Launch Center Pro and 1Password.

Open Launch Center Pro and tap on one of the + icons to create a new action. In the URL field, enter the following:

onepassword://search/{{YOURSEARCHTERM}}

From Skitch

If you create this action using the Action Composer in Launch Center Pro, it will default to providing a keyboard prompt for the search term. That means that every time you launch the action, you’ll need to type in your search term. That’s very useful, but it’s not how I look up my iCloud password. To do that, I have iCloudlg inside the double curly brackets. The lg there stands for login, as in iCloud login. I added those two extra letters so that when I search my 1Password vault for “iCloudlg”, I will only get my iCloud login account. Without that suffix, every account that uses my iCloud e-mail address for the username shows up in the list, and that’s not what I want.

(You might notice in the screenshot that I also use a custom iCloud icon for the action. I simply downloaded the image for that after a quick Google search, saved it to my Camera Roll, and selected it from within Launch Center Pro. This makes the action very easy to identify at a glance.)

So, whenever I need my iCloud password, I simply open Launch Center Pro, trigger the saved Search for iCloudlg action, use Touch ID to unlock 1Password, swipe to the right across the iCloud entry, copy the password, and I’m in business. That sounds like a lot of steps, but the iOS device does most of the work, and it’s a lot easier than manually searching 1Password for “iCloud” every time I need to do so.

Keeping Track of Phone Messages & Conversations

NPW 001 - Line2 plus Evernote

Problem

In the old days (2–3 years ago), we had a landline for our non-profit, and all too often I found myself writing down notes about a voicemail or a phone conversation in a notebook. The obvious downside to that is that those notebooks aren’t searchable (that is, not without significant effort to digitize them). This wasn’t a good long-term plan in my estimation, so I set out to find a better way to do this. And I did.

Solution

We swtiched our phone from a landline to a VoIP service—Line2,to be precise—and I started using Evernote to keep up with messages and conversations. I’d started using Evernote to take notes during phone calls even before we moved away from a landline, but my use of it for this really took off once we started using VoIP. One of the best features of Line2 (and one that I assume is also true of other VoIP providers) is that whenever a voicemail is left, an mp3 copy of the message is automatically e-mailed to you. So I set up a simple rule that automatically forwards those voicemail notification e-mails to my Evernote account. That does three things:

  1. It gives me an archive of the voicemail itself, in case I ever have to go back to it. It’s rare that I have to replay a voicemail, but it has happened.
  2. It gives me an easy place to take notes on my conversation with that person. It also means that if I call someone back and have to leave them a voicemail, I can record that all in the same place.
  3. It makes all of this easily searchable, as Evernote has excellent search capabilities.

This has worked exceptionally well for me over the past couple of years. Having all of these voicemails in Evernote has made me almost fully reliable when it comes to calling someone back, and it has also saved us a considerable amount of money. Our phone bill is now significantly less than it was before making this change. I call that a win-win.